Pages

Showing posts with label wigets. Show all posts

SEO Tips for Blogger - Part 1

0


Search Engine Optimizatio or SEO - All of you might have heard of it??So what exactly is it?

What do we do to make our Blog Friendly to our readers? - We do change the layout and design so that our blog looks elegant to eyes.

What do we do to make our Blog friendly to Search Engines like Google,Yahoo and Bing? - Here is where we should do SEO..
Unlike Wordpress and other blogging platforms,Blogger automatically does some SEO work for us making the job easier for us.Still there are some areas where we can do something

Here is a collection of My SEO tips for my beloved readers..

1) Don't put too much posts on homepage - When you put too much content on homepage, it leads to duplicate content. Means many pages on your blog will have similar content. Your latest post page and your homepage has got the same content rite?

2) Submit a Sitemap to Google Webmaster Tools

3) You will have links to feeds on your pages. Or may be some links to social bookmarking sites. Too many links on a page makes it unfriendly for search engines. So you should add the rel='nofollow' tag to such not so important links..

- Feed links (The blog feed has same content as your blog.So it is important that you make the feed links nofollow)
- Social Bokkmarking links - If you use social bookmark buttons like that for digg,stumble twitter etc, try making them nofollow..
- Links to unimportant pages(unimportant to search engines.. ;) )like contact me page,link to me page,about me page etc..
link name is a dofollow url
link name is the nofollow version of the same link

4) Use the Title Tag Hack

5) Use Meta Tags
- What you shouldn't do when using meta tags - I have seen many blogs using the same meta tag for all pages of the blog.You should never use such duplicate meta tags, I suggest that you use a separate meta description and keywords for your home page.You can use b:if conditions to do this.

6) Get back links.. Get more links to your site from your friends.. ;)  You can also add a Link to your site Widget .

7) Submit your blog to Directories. - One of them is here Blogger Directory

8)I won't add a archive widget.If i do it i will display it on a particular page only. - Why? The archive widget has so many links in it..As i said too many links on a page is unfriendly to search engines.

9)Don't add additional ROBOT meta tags.. Some guys try adding tags like
Blogger automatically does some SEO for it.. Don't override it. You know something? Every blogger blog has got a robots.txt file.. see mine.. http://www.bloggerplugins.org/robots.txt Off course we cant edit them.

10)When building back links use your primary keyword as the anchor text. Anchor Text - > Just to explain what an Anchor Text is.
I use Blogger Widgets as my Anchor Text.

11) Use Alt tags for images. When you use images try to add alt tags. For example can be replaced as

12) Focus on what you write. Always try to write some unique and interesting content.You cant hope to be on top of search engines with copy paste blog posts..

These are some of the ones that i remember..Will update it if i find anymore.

Recent Posts with Thumbnails for Blogger - And lots more @2theyouth

0

Recent Posts with thumbnails for blogger

Update: This gadget is now one of the 7 featured gadgets on the official blogger gadget directory(The Add Gadget > Featured Page)
Recent Posts widget For Blogger [With thumbnails and lots more].
This is the first widget of it kind. Actually i made this for the new blogger gadget directory.


Gadget Demo

Recent Posts Widget with thumbnails for blogger

What is special about this gadget?
1) Like many other recent posts widgets this one also displays your recent posts with summaries comment numbers etc..but yea with a greater degree of customization

2) Image thumnails - Many of you might not have heard of MediaThumbnails. When you add some image to blogger,blogger automatically generates a thumbnail image of a small size 75 x 75. You wont see this small image anywhere but we are using this small sized images for post thumbnails.As i said this is somthing unique.All the recent post widgets till now(till the time i made this post lolz..) uses the original big images and scales them down using css.This means that your computer will have to fetch all of those big images.But with this widget we are fetching the media thumbnails.The media thumbnails as i said are of small resolution and hence very less size(somehere between 1kb-10kb)
The advantage of using media thumbnail is that out widget will load much much much faster than the other ones available till now.

3)You can display the recent posts of any blogger blog on your sidebar using this widget(display is not limited to your blogposts alone)

4)Highly customizable. (you can understand that when you actually install it.. :)

5)This is all that i have to say about the widget.. You can checkout more of its features by intsalling it onto your blog..Actually i now feel that it has too many options.. ;)

How to Install this new Advanced Recent Posts Gadget ?

Method 1 Gadget Using the new Gadget API


Select the options that you want(The gadget preview may be a little buggy.. some probs on the API i guess..)

Method 2 If you are used to my normal widget installers,then you can use this button fill in the options and there you go.. :)[This will fix the font issues or anything like that which may occur in the gadget]


If you are a gadget developer or a if you plan to use this script tutorial or if you intend to make a modified form of the widget Do link mack to this blog and to this post using the following code.

Gimme more suggestions. I am planning to make more gadgets for the blogger Gadget Directory!!
This is my first gadget on the gadget directory. I would always love to tweak the widget further to make it easier and frienlier..

The Complete FeedBurner Guide with Some Cool Enhancements @2theyouth

0

What is Feedburner?

Feedburner is a service(now owned by google) which helps you in publishing your feeds in a better way.It helps you analyze your feeds,keep track of your visitors,know the number of feed subscribers etc.

How to Use Feed Burner?

1.Login to Feedburner.com using your Google account
2.Copy your blog url,or your blog feed url and paste that url at feedburner.com
adding-your-blog-feeds-to-feedburner
3.If you pasted your blog url(yourblog.blogspot.com) instead of your feed url (yourblog.blogspot.com/feeds/posts/default),then feedburner should be able to fetch your feed url automatically.[If you don't have a malformed template]
4.In the Next Step Give Title to your feed(Probably your site title itself) and also pickup a fancy slug(the final feed url will be http://feeds.feedburner.com/slug)
giiving-your-feed-title-and-handle-at-feedburner
5.In the Next Stage,you should have finished Creating your feed
congrats-you-got-your-feedburner-feed
6.Now your feed should be live at http://feeds.feedburner.com/yourfeedslug

Branding Your Feedburner Feeds

You can Apply Domain Branding and Email Branding on Feed Burner

What is Domain Branding?

This is what we normally do-We burn our blog feeds using Feed Burner and ask our visitors to go to our feedburner Url to subscribe to our feed.
Wouldn't it be better if we were able to make the feed a part of our own domain rather than asking them go to a url like feeds.feedburner.com/yourfeedname .Now with feedburner you can do that too. For example look at my feed url http://feeds.bloggerplugins.org/BloggerPlugins . Doesn't it look better than http://feeds.feedburner.com/BloggerPlugins ?.Domain Branding can be done only if you have your own Custom Domain

What is Email Branding?

If you have activated the Email Subscriptions Option in feedburner,then users will be able to subscribe to your feeds by email.When someone subscribes via email,feedburner will sent feed  updates to all the email subscribers.We can brand the emails being sent.We can decide on the email from which the feeds should be sent(I use feeds@bloggerplugins.org) .You can also Brand the email by including your logo in the emails.You can do This from the different Sub Options under Email Subscriptions in the Publicize Tab at Feedburner.

How Does Branding Help Me?

Branding helps you in giving a professional touch to your feeds.You will now feel like a better owner of the feeds as the feeds can be viewed from your own sub-domain.

Will i loose my existing Subscribers if i  Opt for branding?

No, you are actually just making your original feed visible on your feed specific domain.And even your old feed url will  continue to work..Ie if you have http://feeds.feedburner.com/FeedName , then after setting up branding, you will have the feed available at http://myfeedspecificdomain/FeedName also. These feeds are actually the same.So you wont loose any subscribers when you change the feed links on your blog with your new branded feed url

How To Setup Domain Branding?

Do you remember how you configured the Custom Domain For Blogger? You created a CNAME record for that.Its the same method for this one also.
Login to your Feed Burner Account and Navigate To the My Account Section(Top right Nav)
Now From the Left Pane Opt for My Brand
you will see something like
feeds CNAME something.feedproxy.ghs.google.com on the right pane.
Now Create a CNAME record with the Name feeds and value something.feedproxy.ghs.google.com  from your domain control panel(in the same way as you did for the custom domain)
Now add the new feed sub ddomain on the Right Pane(Feedburner) – I gave feeds.blogegrplugins.org as i have created a CNAME with name feeds
After doing this,my feed feeds.feedburner.com/BloggerPlugins became visible at feeds.bloggerplugins.org/BloggerPlugins.

How to Setup Email Branding?

Navigate to the Publicize Tab and Opt for Email Subscriptions.If it is not yet activates,then activate it.Now in Communication Preferences,you can provide your custom email[user@yourdomainname] .I used feeds@bloggerplugins.org .You can also format the email Properly in a custom way,and also add a logo to your email feeds by filling in the options in the Branding submenu.

Configuring Blogger To use our new FeedBurner Feed(Feed Redirection)

1.Login to your Blogger DashBoard
2.Goto Settings > Site Feed
3.Give Your new Feedburner Feed Url there and Save the Settings.
redirect-blogger-feeds-to-feedburner
4.If you have used any links on your blog,pointing to your blogger feed,then change then replace them with the new FeedBurner Feed Url
5.Now anyone trying to access http://yourblog.blogspot.com/feeds/posts/default(and other blogger post feed urls) will be redirected to the Feedburner Feed that we Specified.

Adding Feedburner Email Subscription To Blogger

1.Login to Feedburner and Go to The Publicize Tab.
2.Look for the Email Subscriptions link in the left pane and click it
3.If you haven’t activated that service,Activate it.
4.Now Copy the Subscription Form Code from the right pane.
5.Make a New HTML/JavaScript Gadget in Blogger and Paste this code in that Gadget and save it.
6.Now you should have an email subscription form on your blog

Adding The Feedburner Feed Count to Blogger

1.At Feedburner Navigate to the Publicize Tab
2.Look for the Feed Count link in the left pane and click it
3.If you haven’t activated this service activate it
4.Choose the Proper Colors for the counter and click Save
5.Now Copy the Code from there and add it to any HTML/Javascript Gadget.If you have branded your feed URL,then make sure that you change the feedburner feed url in this code to your branded URL(i changed feeds.feedburner.com/BloggerPlugins to feeds.bloggerplugins.org/BloggerPlugins

Adding The Feed Link to Blogger Instead of the Counter

<a href="my feed url" title="Subscribe To My Feed" rel="nofollow">Subscribe to My Feeda>
You can modify the above Code with your feed url and paste into into an HTML/Javascript Gadget to have a Subscription Link on your Blog.If you need a better looking link,then
1.Navigate To the Publicize tab in Feedburner
2.Look For Chicklet Chooser in the Left Pane,and click it
3.Select the proper link that you need from the right pane and copy out the code
4.Paste this into an HTML/Javascript Gadget(If you used a branded domain make sure that you replaced the feedburner feed url with your branded feed url)

Preventing Search Engines From Indexing Your Feed

1.Login to your Feedburner Account and Navigate to the Publicize Tab
2.Now In the Left Pane,Look For the NoIndex Link
3.In The right pane,indicate that your feed shouldn't be indexed and activate that service
prevent-search-engines-from-indexing-your-feed
I have tried to explain all important aspects of using FeedBurner.Did i miss out anything important?If so Kindly let me know and i  will update the post. Did you fall into trouble trying to use a branded feed url??  

Related Posts Widget For Blogger @2theyouth

0

Related Posts Widget  for Blogger v1

The related posts widget will show a new related posts section below your post.The related posts widget fetches the related posts from those posts having the same label as the current post.
To implement the related posts widget you will have to follow 2 simple replacement steps.
1.Login to your blogger account and get into your Dashboard
2.From there go to Layout > Edit HTML and expand your widget templates(option on the right)
3.Now find this line of code
head>
and replace it with

<b:if cond='data:blog.pageType == "item"'>
<style type="text/css">
#related-posts {
float:center;
text-transform:none;
height:100%;
min-height:100%;
padding-top:5px;
padding-left:5px;
}
#related-posts .widget{
padding-left:6px;
margin-bottom:10px;

}
#related-posts .widget h2, #related-posts h2{
font-size: 1.6em;
font-weight: bold;
color: black;
font-family: Georgia, “Times New Roman”, Times, serif;
margin-bottom: 0.75em;
margin-top: 0em;
padding-top: 0em;
}
#related-posts a{
color:blue;
}
#related-posts a:hover{
color:blue;
}
#related-posts ul{
list-style-type:none;
margin:0 0 0px 0;
padding:0px;
text-decoration:bold;
font-size:15px;
text-color:#000000
}
#related-posts ul li{
background:transparent url(https://blogger.googleusercontent.com/img/b/R29vZ2xl/AVvXsEjNzEdC58Hgus0oiJY1GLmYU5vd9hmcvpF6YVHabcHam-uSfdlkdAxIRq28oYua4UqWytb9E86b-KzucUhrqlWdHGwplwmG11jZsqHx23Hov3ilCygsQthyphenhyphen2rATHQZ5eViG4WG2smM6SpU/s200/greentickbullet.png) no-repeat ;
display:block;
list-style-type:none;
margin-bottom: 13px;
padding-left: 30px;
padding-top:0px;}
style>

<script type='text/javascript'>
var relatedpoststitle="Related Posts";
script>
<script src='http://blogergadgets.googlecode.com/files/related-posts-for-blogger.js' type='text/javascript'/>

b:if>

head>
If you want to change the title of your widget you can edit this line of the above code
var relatedpoststitle="Related Posts";
If you want you can edit the blue and black colors present in this code 4.Now find this line of code
<div class='post-footer-line post-footer-line-1'>
If you cant find it then try finding this one
<p class='post-footer-line post-footer-line-1'>
Now immediately after any of these lines(whichever you could find) place this code snippet


<b:if cond='data:blog.pageType == "item"'>
<div id='related-posts'>
<b:loop values='data:post.labels' var='label'>

<b:if cond='data:label.isLast != "true"'>
b:if>
<b:if cond='data:blog.pageType == "item"'>

<script expr:src='"/feeds/posts/default/-/" + data:label.name + "?alt=json-in-script&callback=related_results_labels&max-results=6"' type='text/javascript'/>b:if>b:loop><a href='http://www.bloggerplugins.org/2009/08/related-posts-for-blogger-widget.html'>Related Posts Widget for Blogger

Some Tricks for making links in Blogger Posts

0


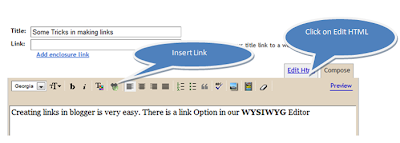
Creating links in blogger is very easy. There is a link Option in our WYSIWYG Editor.When you use this option you can easily add a new link. Now to see the Code of this link just clisk on the Edit Html Option on your Editor[See image for details]
There you will see something like


Additional Options
1.Open The link in New Window
To open the link in a new window,add the target="_blank" option to your link so that the code becomes something like
Relation attribute can be specified by adding the rel="relation"
The relation attribute is used to specify the relation of the link to the our post. One commonly used relation is external which specifies that the link is a link to an external page
The external relation is not much useful to us.But there is yet another one,
rel="nofollow" - When we add this to a link,we specify the search engines that they shouldn't go exploring this link url from our post page.This thing is important.Having too many links[especially to external pages] is not good for Search Engine Optimization. So if you link to some external website use the rel="nofollow" option
[Note:Don't use the rel="nofollow" option when you are giving credit to the original author of an article that you use in your blog.They deserve to be followed by the search Engines :)]
3.Adding the Title Attribute
If you add a title attribute to a link,then if someone hovers his mouse over that link,the title will be displatyed as a description of the link.
As an example try doing a hover over the next link[W3Schools] it will display Title of the link to W3 Schools.This is beacuse i have given this text as the tilte attribute of that link
To know more about the different attributes available for links visit W3Schools . Its the best place for a beginner.
4.Remove Underlining of a link
In some blogger templates,the links within the posts may be underlined. To remove the underlining you can use the style attribute - text-decoration:none
5.List of Links
If you want to use a list of links ,then you should use the
      and


You can also use the ordered and unordered lists for arranging normal text[other than links]  

How to add Pages to Blogger like in Wordpress @2theyouth

0
UPDATE - Blogger has now officially released its own version of the pages- More info
Many of you might have wanted to use pages for Blogger like in Wordpress.But unfortunately Blogger doesn't provide any thing like Wordpress Pages.But there is still something that can be done.To know what i am talking about,just have a look at my About Page .
To create a Wordpress like page in blogger,we will first create a normal post in blogger.If you don't want this post to be shown in your feed updates,change the date of the post to something very old[may be an year back.See the pic for details] . If you want to prevent users from posting comments on your pages,you can disable commenting on this particular post[see the pic for details]
Now publish your post.We will use this as a pge.You might want to hide the social bookmarking icons and such other stuff from your ‘’pseudo pages’. Actually our blogger template is full of different divisions and we style each of these divisions using CSS.Using CSS rules,it is also possible to hide some of these divisions.So what must we be doing?We need to hide some unwanted divisions on our new pseudo page.
Ok, to Do this find the tag in your template.Just before this,we will add some additional CSS rules to hide those unwanted parts and divisions.We will use the b:if conditions to make the hiding affect our pseudo page only..[so that these rules don't hide these divisions on other pages]
Just before the ,insert the following


Here i have given some list if divisions which should be hidden.If you need to hide any other divisions you can add this to the list but make sure to separate the different divisions using commas.

Height Fixer For Blogger @2theyouth

0

Making the Sidebar and the Post Area to be of Same Height

Some of the simple blogger templates use CSS to set the background color of the sidebar and the main post part.In this case,the heights of these two columns can be different making it look a little awkward.In many cases you may want to make both of these columns of the same height.
If you didn't understand what i am talking of,then i will show you some demos.
Check out the sidebars of both
Blog Without Height Fixing – Link
Blog After Height Fixing – Link
The height adjustment can be done using a very simple javascript code.Actually i had to make something like this for another site of mine.So i thought of sharing this with you guys,
Here is the height fixing script.

<script type='text/javascript'>
<!--
onload=function() {

var mh = document.getElementById('main-wrapper').offsetHeight;
var sh = document.getElementById('sidebar-wrapper').offsetHeight;
if(sh>mh) mh=sh;
document.getElementById('main-wrapper').style.height = document.getElementById('sidebar-wrapper').style.height = mh+ 'px'
 }
//-->
</script>

What does this height fixer do?

When the page is fully loaded,this javascript code will get executed(as we have used onload). Now the variable mh will get the value of the height of the div with id main-wrapper.The variable sh will get the value of the height of the div with id sidebar-wrapper,Next we make a check.We check if sh is greater than mh.The greater of these values will be assigned to the variable mh
Now we set the height of both the divs[div with id sidebar-wrapper and the div with id main-wrapper]  as sh pixels. So what does this actually do?? This script checks which of these divs have a larger height and assigns that larger height to both of these divs thus making both of them of equal height.

Where to place this height Fixer Code?

The height fixer code can be placed anywhere in the head section of your template.If you are still confused about where to place the code,then place it just above
head>

Where else Can i Use this Script?

This script can be used anywhere where you need to adjust the height of two divisions(divs) to be the same.In that case don’t forget to change main-wrapper and sidebar-wrapper in this script with the respective ids of those divs.That means you can use this script to adjust the height of any two columns and make them of same height.
Why is the script having so many complex characters like < > etc?.
This is a parsed javascript.Blogger has problems with normal javascript(you might know this if you have tried to add the adsense code into the template).

Does this work on All Browsers?

This is a a very simple javascript code and it will work on all browsers.

Link to me widget for blogger

0

This is a nice little widget which can find its place in your blog’s sidebar.You might want to let your readers link back to you in an easy way.We will now make a new Link To Me Widget which will display the code needed for a reader to link back to your blog.We will also provide a Add link using Blogger Button.
This button will work like a widget installer,which makes it easier for your readers to add your link.They can link back to you easily by adding your link to me widget.

How to make the Link to me Widget?

1.First of all Make a Small Logo of your blog,which can easily fit into any blog sidebars.It should be small and pretty :P
2.Now upload this image somewhere.[You can use blogger to upload the logo if you want or you can opt for some service like tinypic.com]
3.Now note the url of this uploaded image
4.Ok now you Copy the following  Code into a Text File
<p>If you like this blog,then link back to me.<br/>
This is what you will see.p>
<div style="text-align: center;">
<a style="border:0px;text-decoration:none;" href="Your_Blog_URL" title="Your_Blog_Title">
<img alt="Your_Blog_Title" style="border: 0px;" src="Url_of_a_Small_logo_of_your_blog"/>
a>
div>
<textarea rows="3" cols="30">
<a href="Your_Blog_URL" title="Your_Blog_Title" style="text-decoration:none;border:0;">
<img src="Url_of_a_Small_logo_of_your_blog" alt="Your_Blog_Title" style="border:0" />
</a>
textarea><br/>
<br/>

Optionally use this Widget installer to add this link to your blogger blog.

<form action="http://beta.blogger.com/add-widget" method="post" target="_blank">
<input style="display: none;" value="My Favourite Site" name="widget.title"/>
<textarea style="display: none;" name="widget.content">
<a href="Your_Blog_URL" title="Your_Blog_Title" style="text-decoration:none;border:0;">
<img src="Url_of_a_Small_logo_of_your_blog" alt="Your_Blog_Title" style="border:0" />
</a>
textarea>
<br/>
<input style="border:0px;" src="http://www.blogger.com/img/add/add2blogger_lg.gif" value="Link To Your_Blog_Title" name="go" type="image"/>
form>
5.In this code replace all occurrences of Your_Blog_Title with the Title of your blog
6.Replace all occurrences of Your_Blog_URL with the url of your blog.
7.Replace all occurrences of Url_of_a_Small_logo_of_your_blog with the url of the logo that you uploaded.
8.Now your code is Ready!!
9.Copy out the modified code from your text editor.
10.Now Goto Blogger > Layout page
11.Choose to add a gadget and Opt for HTML/Javascript
12.In that widget paste the modified Code and Save.
Now you should have a link to me widget on your blog.If you want to test the Add Link With Blogger Button,Then try adding the widget to your blog itself.[You can remove it after testing!]
With Slight Modifications to the code,you can change this to a text link instead of an image link.

Post Summaries on Blogger With Read More @2theyouth

0

Blogger is fulfilling some of our expectations. Now blogger officially supports Post Summaries With Read more.This means that you wont need any JavaScript and CSS based tricks to display post summaries on Non-Post Pages.The static pages would be out soon. A screenshot on the official blogger buzz blog has made it more clear.

How Does This Work

Blogger has introduced something called jump breaks. This will help you in creating the summary.
What is a jump break? - Jump break is a special tag which can be inserted anywhere in a post using the post editor.When you have inserted a jump break into a post, the portion of the post above(or before) the jump break will serve as the summary of the post. This means that only this smaller portion will be displayed on Non-post pages.

How to insert a jump break?

If you are using the New Advanced Post Editor, then you can insert the jump break easily from the post editor.
If you are not using the New Post editor,then you will have to manually type the jump break tag . To do that just place [Note that there is a space before and after more.] at the position where you want the break to occur. Now try going to your home page,and only the summary would be displayed on the home page.You might get problems if you are using a modified and highly customized template. In that case try the following adjustments. Go to your Blogger Layout > Edit HTML and expand the Widget templates. Now check if the following code is already present in your template
<b:if cond='data:post.hasJumpLink'>
      <div class='jump-link'>
        <a expr:href='data:post.url + "#more"'><data:post.jumpText/>a>  
      div>
    b:if>
If this code is not present in your template,then add this code before
<div class='post-footer'>
Now it should work properly.. If it doesn't,then leave a comment here and i will try to help you out..

Changing the Read More Text

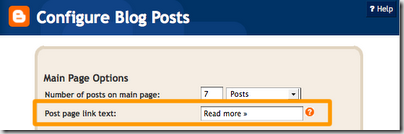
By default the read more link text is Read more »  . You can change this to whatever you like. To do that, Go to Blogger Layout and click on the Edit link on the Blog Posts Widget.
image
Change the Post Page Link Text and Save the Settings..

Drawbacks of the New Feature

For the post summaries to work effectively, you have to edit each of your posts and add the jump link in each of them. Blogger wont generate summaries automatically.:(

A mistake that you might make that can cause the sidebars to move down.

When you insert a jump break in the post,the part of the post after the jump break gets truncated. In your posts,if there are some opening div tags before the jump break and some of these are closed after the jump break then problem arises. When blogger truncates the part of the post after the jump break,the closing div gets missing. That's why the sidebar shifts to the bottom.
So in order to solve this you should take some care in inserting the jump break.The jump break shouldn't be inserted into open tags..
For example something like this shouldn't happen.(You can see these things if you switch to Edit HTML instead of Compose)


This is the short summary

Numbered Page Navigation For Blogger , newpost| oldpost |home

0


 Page Navigation is a really awesome and long awaited feature. You might have seen numbered page navigation on many wordpress blogs(wp-pagenavi by Lester Chan). Muhammad Rias of Techie Blogger had already developed a page navigation system for blogger.It really was an awesome trick which was made at a time when nobody could even think of implementing it on blogger.It had some minor bugs and now Abu Farhan has perfected it and he has now given us the perfect page navigation solution.Here is a little screenshot of what this is all about. blogger page navigation
When you use this hack,you will see this kind of navigation on your blog’s home page and label pages(needs little customization).

Implementation of Blogger Page Navigation

Those who are bad at HTML modifications can use my one click installer :)
  After installing this widget proceed to the label fix.

The Complex Method. :P

If you installed the widget you shouldn’t be here.. Scroll down to the label fix.
1.Login to Blogger Dashboard and navigate to Layout > Edit Html
2.Don’t click the checkbox which says ‘Expand Widget Templates’
3.Now find
]]>b:skin>
and replace it with
.showpageArea a {
text-decoration:underline;
}
.showpageNum a {
text-decoration:none;
border: 1px solid #cccccc;
margin:0 3px;
padding:3px;
}
.showpageNum a:hover {
border: 1px solid #cccccc;
background-color:#cccccc;
}
.showpagePoint {
color:#333;
text-decoration:none;
border: 1px solid #cccccc;
background: #cccccc;
margin:0 3px;
padding:3px;
}
.showpageOf {
text-decoration:none;
padding:3px;
margin: 0 3px 0 0;
}
.showpage a {
text-decoration:none;
border: 1px solid #cccccc;
padding:3px;
}
.showpage a:hover {
text-decoration:none;
}
.showpageNum a:link,.showpage a:link {
text-decoration:none;
color:#333333;
}
]]>b:skin>
This is the CSS part which defines the look and feel of the page navigation.You can modify it according to your need
4.Next is the JavaScript part. Find
body>
and replace it with

<b:if cond='data:blog.pageType != "item"'>
<b:if cond='data:blog.pageType != "static_page"'>
<script type='text/javascript'>
var pageCount=5;
var displayPageNum=5;
var upPageWord ='Previous';
var downPageWord ='Next';
script>
<script src='http://blogergadgets.googlecode.com/files/blogger-page-navi.v1.js' type='text/javascript'/>
b:if>
b:if>

body>
As you can see,there are some customizable parameters in this code
var pageCount=5;
This code determines the number of posts that would be displayed per page.
var displayPageNum=5;
This code determines the number of additional page navigation numbers that will be displayed on the page.
var upPageWord ='Previous';
var downPageWord ='Next';
These two lines determine the text that would be shown for the previous page and next page respectively.

Label Fix

Now we have another problem.By default,the blogger label pages will show 20 posts.We will have to cut this down to the value that we gave for the variable pageCount (or the posts per page).For this we will have to edit our template

How to Edit the template to cut short the posts per page?

Go to the Edit HTML page and expand the Widget Templates
Now find each occurrence of
'data:label.url'
(including the quotes) and replace each of it with
'data:label.url + "?&max-results=5"'
Here 5 is the number of posts to be displayed per page.
Now if you are using the label cloud widget by phydeaux3,then find
a.href = '/search/label/'+encodeURIComponent(t);
and replace it with
a.href = '/search/label/'+encodeURIComponent(t)+'?&max-results=5';

Here also 5 is the number of posts to be displayed per page.
Now you should have the Blogger Page Navigation working perfectly on your blog. :)

Show avatars on Blogger Comments @2theyouth

0

Blogger is now introducing features every day as part of its 10th birthday celebrations.Now it has formally announced the Blogger Comment avatars. To know what it means take a look at the comments here on this blog and you will see the profiles pictures of the commentators near to the comments.If you are using some default blogger template things would be much easy.Here is a little screenshot of the new feature.

Implementation of Comment Avatars

1.First of all Go to Blogger > Settings >Comments and enable “Show profile images on comment”
2.Now if you have a normal un customized template you will see the avatars on the comments on your blog.
3.If you have a customized template you will have to add some codes and play around with your template.For that first go to Blogger Layout >Edit HTML and backup your template.
4.Expand the widget templates and check if you can find this line there
<dl expr:class='data:post.avatarIndentClass' id='comments-block'>
If you can’t then that means we have something to do..
If you couldn’t find this,then do the following steps.
a)Find
<dl id='comments-block'>
and replace it with
<dl expr:class='data:post.avatarIndentClass' id='comments-block'>
b)Now Find all occurrences of
<a expr:name='data:comment.anchorName'/>
and replace each of it with
<b:if cond='data:comment.favicon'>
<img expr:src='data:comment.favicon' height='16px' style='margin-bottom:-2px;' width='16px'/>
b:if>
<a expr:name='data:comment.anchorName'/>
<b:if cond='data:blog.enabledCommentProfileImages'>
<div expr:class='data:comment.avatarContainerClass'>
<data:comment.authorAvatarImage/>
div>
b:if>
If you are using the author comment highlighting trick and if doesn’t work out with that trick,then leave a comment and i will try to help you out..

Further Styling.

If you want to add a default avatar for the ones with no profile pics,then place the CSS code just above
]]>b:skin>
CSS Code
.avatar-image-container {background:url(https://blogger.googleusercontent.com/img/b/R29vZ2xl/AVvXsEj748bbz7AJqdOeL0Rq-I-C8Juz37yZC789DbfIyfGubOj8Y5TKNcrqZY2Bdg4T4GExMK_b1qTbvRWAMbBYXtYGSLxUcjlk_EChVzBLWfZQuRMrZx4Dr-GQVs1jAmKIgJqx5OsNwCKEaA/s400/default.gif); width:35px;height:35px; }
.avatar-image-container  img { border:none;}
You can customize the CSS according to what you need.
If you need bigger avatars instead of smaller ones,then use the following CSS instead of the one above.
.avatar-image-container{width:50px;height:50px;margin-top:-5px;}
.avatar-image-container img {background:url(https://blogger.googleusercontent.com/img/b/R29vZ2xl/AVvXsEg6sA_TLNeEu4hFKNgtOOsWGoeyDPzmHv3qVN1fgm-rpAgTczRVWSHTKNBAN0uIYICUxjlEaPOn-XwUis0xe3LIxWGupIONusooYX835MputW55y7S3ZbaqMnNpp7re2gUpkFTdB4ETFEQ/s400/grav.png);width:50px;height:50px;}
This will give you a bigger avatar and also a default gravatar image but it has a little drawback.It will also resize the small blogger favicons to a big size.(blooger favicon is displayed when a blogger user doesn’t have a profile avatar.Similarly OpenId also has a similar small icon.. ).
BTW to set you avatar pic you can use two methods.You can choose the edit profile link on your blogger profile and upload an image there,The second method is to enter a blogger comment somewhere in any blogger comment form and then click the Preview button instead of the Post Comment button.Now you will see an option to upload your avatar.
In case anything bad happens restore the template backup.. and comment here..:

A New Make over @2theyouth

0

Hi guys, today i have tried to improve the look of this blog. We now have a new template specially designed and coded for this blog. First of all i would like to thank my friend Klodian of Deluxe Templates for helping me in coding this template.He is just awesome. Thanks a lot buddy for your valuable help and support.. What do you think of this new make over? Give me your feedback guys :)
Rate the New Design
Vote
Rate the New Design

Create a Facebook Fan Page for your Blog @2theyouth

0
facebook-fan-page-for-blogger-blogs
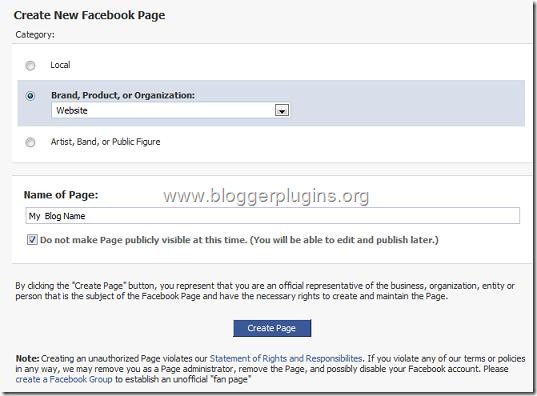
Facebook is a great Social Networking Site to promote your blog or brand. Most of the major brands do have a Facebook Fan Page. Here are some examples of Facebook Fan pages – Coca Cola FB Fan Page , Mashable FB Fan Page. Are you impressed and wanna create one for your blog? I too wanted to create one and i finally made it. Here is the link of my Facebook Fan Page . So lets start making our own Facebook Fan Page for our blog.
1.Go to the Create Fan Page Link on Fabebook
facebook-fan-page-for-blogger
Select Brand, Product, or Organization > Website . Type the Name of your Fan Page and agree to make it public. Now just hit the Create Button and your Fan page would be created :)
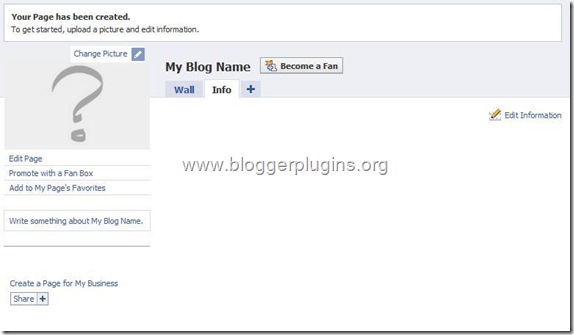
2.On the Next Page, select the options Change picture and Edit Information and you what is to be done there :)
facebook-fan-page-for-blogger-2
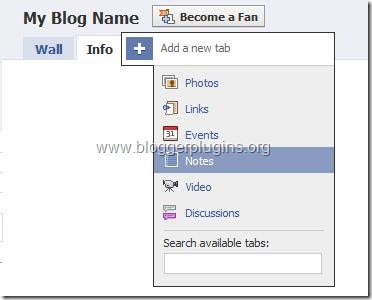
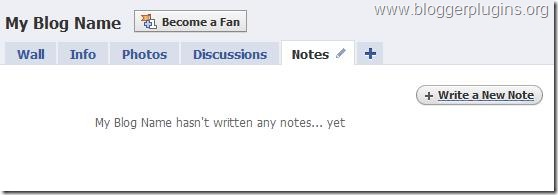
3.Now the most important thing that you might want is to automatically import your blog posts to the Fan Page .From the Tabs, Click on the + and Opt for Notes.
add-notes-to-facebook-fan-page
On the next screen Opt to Write a New Note
write-notes-on-face-book-page
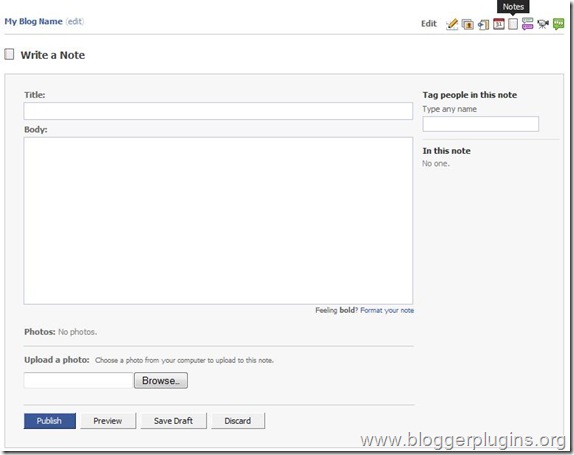
4.You will see an Editor and some icons at the Top . Click on the Notes Icon at the top.
import-notes-to-facebook-page
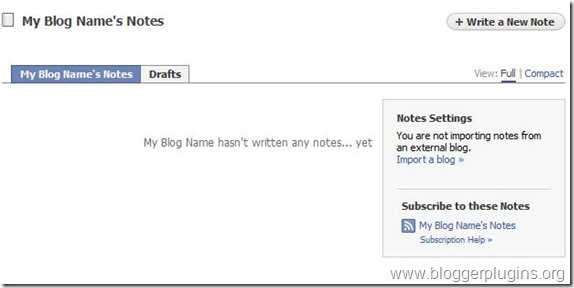
5.On the Next Page, opt for Import a blog
import-blog-to-facebook
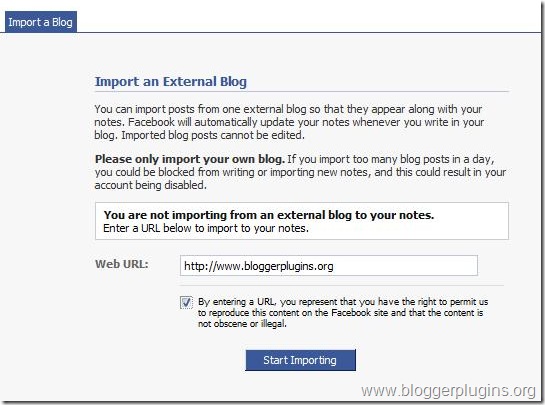
6.On the next screen, type in your blog URL, and agree to the agreement and Click Start Importing
import-blog-posts-to-facebook
If this gives some error try using the url http://yourblog.blogspot.com/feeds/posts/default
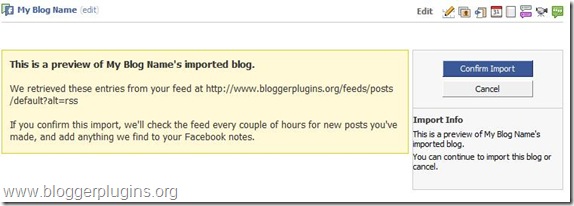
7.On the Next page, Confirm the Blog import
confirm-facebook-blog-import

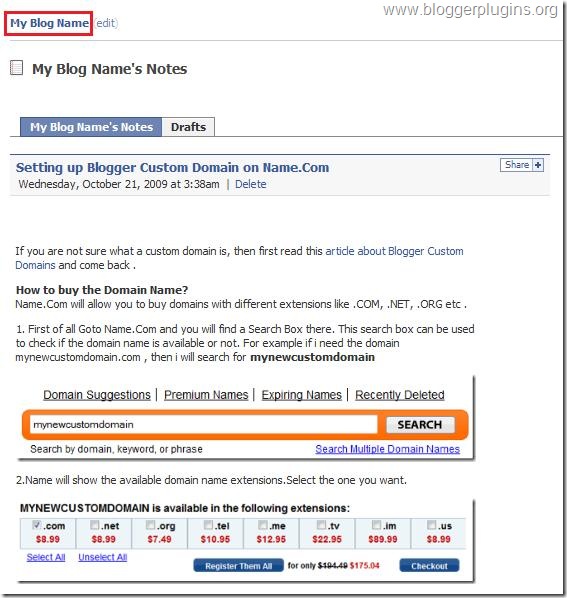
8.After confirming, all your blog posts will be imported to the fan page. Now click on your Fan Page Link and get back to the fan page..
click-on-face-book-fan-page-link
9.promote-with-fan-box Now we have successfully created the Fan Page.If you want to remove some of the unwanted tabs like Discussions, Photos, Boxes etc, then you can go to that Tab and remove it.
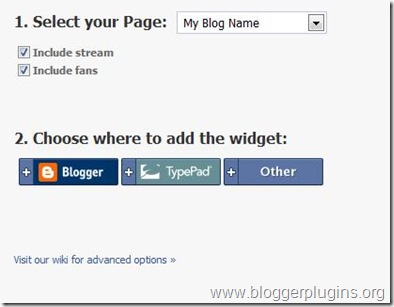
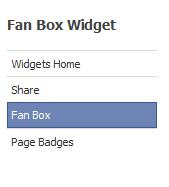
Now you can add a Fan box to your blog so that your blog readers can join you on Facebook. To do this, goto the Page Badges Link .Select Fanbox from the Left menu
Now Select your page and the Options that you want and then opt to to add the fan box to blogger using the Blogger Button
add-fan-box-to-blogger
Now you should have the Fan box added on to your blog :)
Your Fan Page URL will look something like http://www.facebook.com/pages/Blogger-Widgets/252379165362 .Now if you have a pretty good number of fans(i think the minimum requirement is 25 fans) , then you can have a pretty facebook URL like http://www.facebook.com/bloggerplugins instead of a long one like http://www.facebook.com/pages/Blogger-Widgets/252379165362 .
To claim such small usernames for your facebook page, go to http://www.facebook.com/username/ and Click on Set a username for your Pages. There you can select the small pretty user name for your fan page.Once you opt for a user name you can’t change it back again. So be careful when choosing your Facebook Fan Page Username.
10. This is the most important Step of all ;)
Be my fan on Facebook ;)  and you will get all my blog updates on my Facebook Fan Page.

Setting up Blogger Custom Domain on Name.Com @2theyouth

0

If you are not sure what a custom domain is, then first read this article about Blogger Custom Domains and come back .

How to buy the Domain Name?

Name.Com will allow you to buy domains with different extensions like .COM, .NET, .ORG etc .
1. First of all Goto Name.Com and you will find a Search Box there. This search box can be used to check if the domain name is available or not. For example if i need the domain mynewcustomdomain.com , then i will search for mynewcustomdomain
name-custom-domain-1
2.Name will show the available domain name extensions.Select the one you want.
blogger-custom-domain-name.com
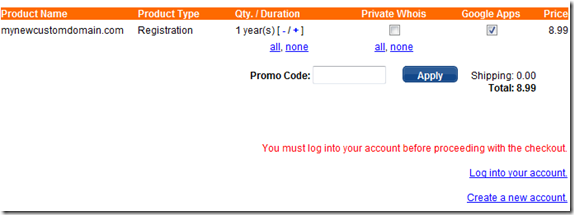
3.Click the Checkout Button and on the next screen opt to create an account(if you don’t have one. if you have one , then login with that account)
custom-domain-part-3
4.Now finish the payment process(using credit card or paypal) and you will be having the domain under your name.com account

How to Setup the Blogger Custom Domain?

1.If you are logged in at your name.com account, then click  the Account Icon V
name.com-customdomain-setup-for-blogger
2. Now you will be taken to a page listing all your domains. Click on the domain name which you want to use for your blogger blog.
custom-domain-on-blogger
3. On the next screen Click DNS Management form the Right Sidebarname1
4.In the DNS Management, add a new CNAME record with the following values CNAME, www, ghs.google.com,1800 and submit
name2
5.Now again add another DNS record with the following values A, (leave next field blank),216.239.32.21 and 1800 and click submit
name3
Create 3 More A records with following set of values
A , (leave the second field blank),   216.239.34.21 ,1800
A , (leave the second field blank),   216.239.36.21 ,1800
A,  (leave the second field blank) ,  216.239.38.21 ,1800

6. Now we are done setting up the CNAMES and A Records
Adding the Custom domain at Blogger.com
1.Login to your Blogger Dashboard and Navigate to Settings > Publishing.
2.Opt For Switch to:  Custom Domain (Point your own registered domain name to your blog)    and switch to advanced settings
3.Type your new domain there ,fill in the Captcha and save the settings.name6
4.Now select the redirection Option and save the settings Once again
5. Now your blog should be visible at your new domain. The changes can take up to 3 days to take effect (This is because your ISP’s DNS Server has to get the new updated information about the domain records.)

Setting Up Google APPs

1.Login to you Name.Com account once again
2.Click the Account Icon and then Click the domain name that we just used.
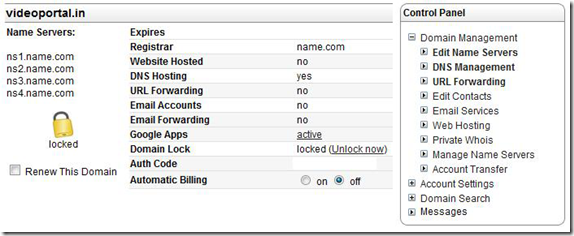
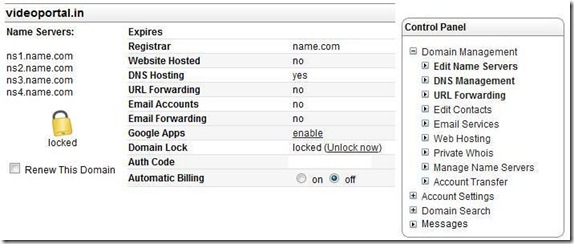
3.Now Click on the Enable link next to Google APPS
name1
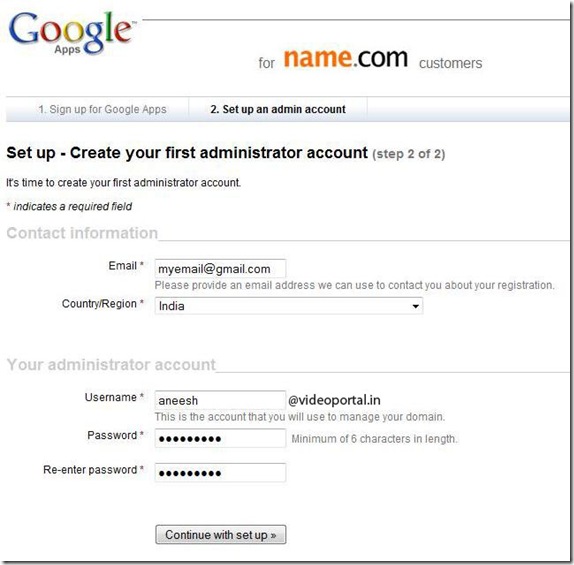
4. On the next Screen fill out the required details and click Continue with setup
name4
5.Now you will be able to access your version of Gmail at http://mail.yourcustomdomain.com and similarly you will have the other Google apps running on your sub domains.